What is GitHub Actions?
Have you heard of GitHub Actions but assumed it was too complicated to learn? I had the same thought — until I used it on a real project (Build and deploy Hugo site with GitHub Actions, Schedule future-dated posts with Github Actions).
Think of GitHub Actions as a robot living on GitHub: you call it, and it does exactly what you’ve told it to do. More precisely, it’s GitHub’s built-in automation. You write a workflow, and GitHub runs it for you whenever one of the events you specify happens.
With GitHub Actions, I no longer build my Hugo site by hand: I push a new post, and the robot builds and deploys it.
In this post I’ll show you the two sections every workflow file needs, then walk you through a six-line workflow that you can paste into your own repository today.
A real example: my Hugo site
Let me make this concrete with my own case of static site generation. With Hugo, the classic approach was to build the site locally and manually, then push the generated public/ folder to GitHub for deployment. With GitHub Actions, GitHub’s servers take over the build. Now I just need to push a new post, and GitHub will build and deploy the site for me.
Even better, GitHub Actions can run on a schedule, so it runs at the time and frequency you choose.
The magic is in the workflow file
So how does it actually work?
The key is to define the workflow file: a .yml or .yaml file under .github/workflows/. It’s the set of instructions we hand the “robot” in advance, so it knows what to do when it’s triggered.
Note: a
workflows/folder can hold several workflow files.
Two sections are required: on and jobs.
The on section: when it runs
The on section specifies which events trigger the workflow. For example, a push to a branch, or a pull_request.
Let’s use the Hugo site as our example. Its workflow lists three triggers: push, schedule, and workflow_dispatch.
on:
  push:
    branches:
      - main
  schedule:
    - cron: '26 1 * * *'
  workflow_dispatch:
The
pushtrigger means the workflow runs whenever someone pushes to themainbranch.The
scheduletrigger runs the workflow on a cron schedule — here, at 01:26 UTC every day. GitHub’s cron uses UTC, so convert your local time. I walk through every cron field in this post).The
workflow_dispatchtrigger lets you run the workflow manually. Normally a workflow only starts in response to an event, so testing it means making a throwaway commit.workflow_dispatchexists precisely so you don’t have to.Adding
workflow_dispatchputs a Run workflow button at the top of the Actions tab. Here’s how to use it:(1) In your repository, click the Actions tab;
(2) In the left sidebar, click the workflow name;
(3) On the right side, click the Run workflow button. The button only exists when the file contains
workflow_dispatch. You can pick the branch here.(4) The new run appears at the top of the list.
Note: pay attention to the indentation before each trigger. I once made the mistake of putting
scheduleon the same indentation level as thebranchesunderpush, that cost me a lot of time debugging.
The jobs section: what it does
The jobs section specifies what the workflow does when it runs. In the Hugo example, the jobs build and deploy the site.
Each job needs two keys:
runs-on: the machine the job runs on (ubuntu-latest,windows-latest,macos-latest, …);steps: the list of individual tasks to run, in order.
The code below shows the build job. The deploy job that follows it is omitted. You can read the full workflow here .
jobs:
  build:
    runs-on: ubuntu-latest
    env:
      HUGO_VERSION: 0.166.0
    steps:
      - name: Install Hugo CLI
        run: wget -O ${{ runner.temp }}/hugo.deb https://github.com/gohugoio/hugo/releases/download/v${HUGO_VERSION}/hugo_extended_${HUGO_VERSION}_linux-amd64.deb && sudo dpkg -i ${{ runner.temp }}/hugo.deb

      - name: Install Dart Sass
        run: sudo snap install dart-sass

      - name: Checkout
        uses: actions/checkout@v4
        with:
          submodules: recursive
          fetch-depth: 0

      - name: Setup Pages
        id: pages
        uses: actions/configure-pages@v4

      - name: Install Node.js dependencies
        run: "[[ -f package-lock.json || -f npm-shrinkwrap.json ]] && npm ci || true"

      - name: Build with Hugo
        env:
          HUGO_CACHEDIR: ${{ runner.temp }}/hugo_cache
          HUGO_ENV: production
        run: hugo --gc --minify

      - name: Upload artifact
        uses: actions/upload-pages-artifact@v3
        with:
          path: ./public
Read the job top to bottom and you can follow the flow: install Hugo and Dart Sass; check out the repository onto the runner; build the site with Hugo; and pack the public/ folder as a Pages artifact.
Try it yourself
In fact, you’ve been using this kind of thing for years — an auto-reply rule in your email app runs the moment a message arrives. GitHub Actions is the same idea applied to your code.
GitHub is full of examples, too. Open your first pull request on a project, for instance, and you may receive a welcome message — that’s GitHub Actions at work.
How do you write your first GitHub Action?
You don’t need a site on GitHub Pages yet. Start small: set up a push-triggered workflow in any repository. Here’s a complete, minimal one:
on: push
jobs:
  hello:
    runs-on: ubuntu-latest
    steps:
      - run: echo "hello"
Save it as .github/workflows/hello.yml in your repository. Push, and it runs.
Keep in mind that GitHub Actions runs on a GitHub-hosted runner, so echo "hello" won’t display on your local terminal. Where does it go?
The output is captured in the run’s log. To view it, open your repository on GitHub and click the Actions tab. Then click the run and then the job (hello in this example).
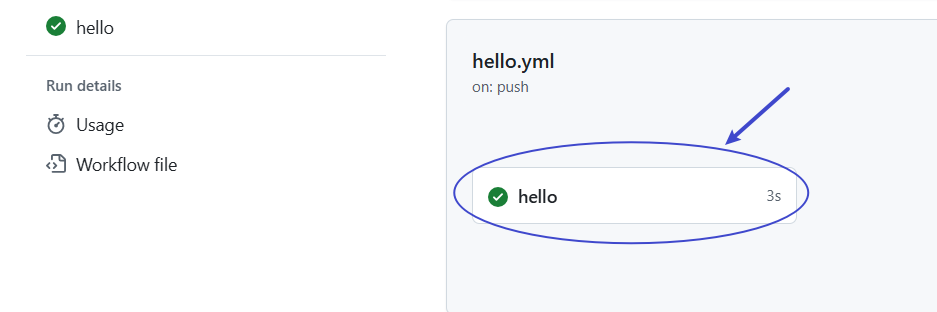
Expand the step, and you will see hello in the log.
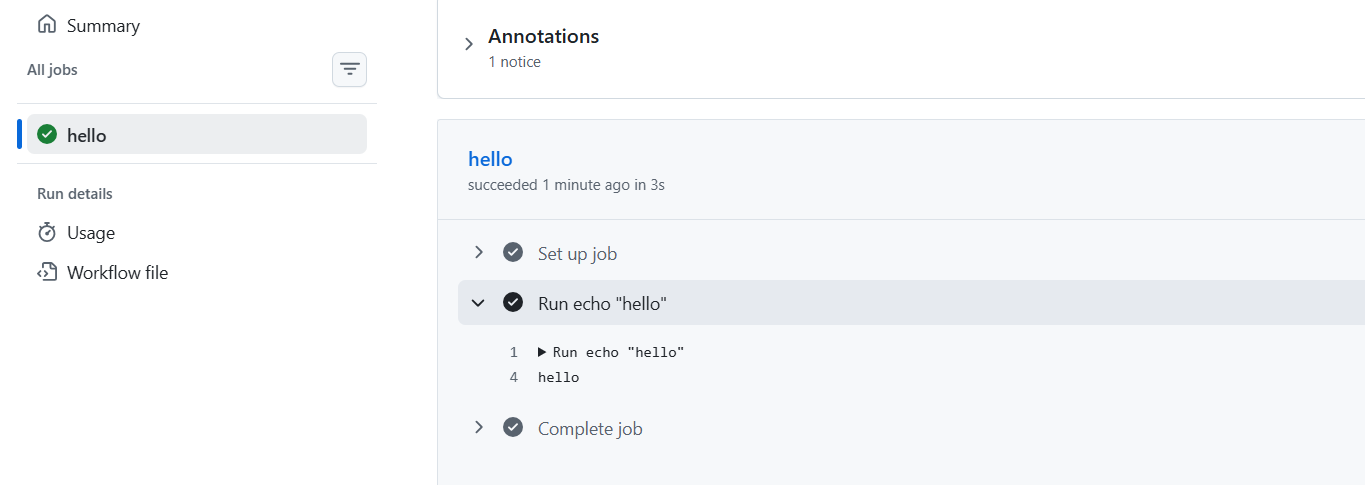
That’s it. Now you have a workflow that runs on every push. And that’s the whole trick: you write a workflow file, GitHub does the work.
If you want to go further:
- Add a schedule: reuse the
scheduletrigger from theonsection so your site rebuilds itself every night, and please remember the cron runs in UTC. - Add a manual trigger: add
workflow_dispatchand you get a Run workflow button, so you can test a workflow change without pushing a throwaway commit. - Read a real one: here’s the full workflow file for my Hugo site. Now you should be able to follow it.
Have you set up GitHub Actions in your own repository yet? I’d love to hear what you’re automating with it.