How to Build a Personal Website Using GitHub Pages and Hugo?
A personal website is a good place to display your work, either your projects or your technical notes. Then how to build one? In this article I’ll introduce the simplest way to build a site.
Site-Building Pipeline
There are two kinds of sites: static sites and dynamic ones.
-
Static sites generate web pages locally, and put them on the server, so every user will get the same view when they click the link.
-
Dynamic sites display different pages to different users on their requests, so it need things like databases.
As beginners, we choose the simpler one — static sites, and it’s easy to follow after you learn the pipeline.

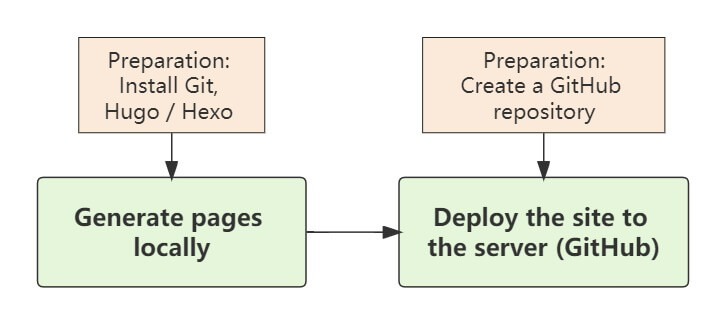
Figure1. The pipeline of building a static website
As shown in the figure above, there are two main steps in building a static website:
- Generate pages locally. The popular static site generators (or frameworks) are JekyII, Hugo, Hexo, etc. Here we’ll use Hugo as an example. Many people (including me) like Hugo because it’s super fast to build a site.
- Deploy the site to the server. Here we’ll use GitHub as the server to store the pages.
Not that hard, right ? Now let’s dive into the details.
Step 0 : Preparation
Install Git . We will use Git Command to generate website, connect to GitHub and push web pages to it.
Step 1 : Generate pages locally
1.1 Install Hugo
Go to Hugo Installation Page , and find the corresponding installation for the operating system you’re using.
I’m using Windows and I haven’t installed Chocolatey or Scoop, so I installed Hugo using binary files following this installation tutorial . If you’re in the same case as mine, you may follow the steps below to install Hugo.
In the following steps,
YourUserNamerefers to the user name of your Windows-system computer. More specifically, it’s the name displayed on the screen when you login in Windows.
(1) Go to folder C:\Users\YourUserName, and create a bin folder in it if it doesn’t exist. The bin folder is the place to store the Hugo binary file.
(2) Add the bin folder to PATH. In Windows Taskbar Search Box, enter cmd and select the Command Prompt result ( right click and choose the “Run as administrator” option ). In Command Prompt, enter :
setx PATH "C:\Users\YourUserName\bin;%PATH%"
Then close and reopen the Command Prompt again, enter echo %PATH% to check if bin has been successfully added to PATH.
(3) Download .zip file from Hugo release page on GitHub . Be Sure to choose the extended version, which will be found near the bottom of the list of archives.
From the .zip extract the binary file hugo.exe and move it to the bin folder. After that, open Command Prompt and enter :
hugo version
If Hugo is successfully installed, you will see a series of characters about information including Hugo version, operating system, build date.
1.2 Create a Hugo site
Supposing you use FolderA to store your site files. Right click FolderA, and select “Git Bash Here” in the menu to open the Git Bash Command. Now enter:
hugo new site MySite
Then a new folder named MySite will be created in FolderA, that is your Hugo site.
1.3 Pick a theme and configure the site
Since a new site has been created, maybe you’d like to see what your Hugo site looks like, but wait a minute, you have to choose a theme first.
What is a theme?
You can regard it as the design of your website. Hugo Themes site has many different themes. When you pick a theme, you can download it from its GitHub repository.
How to pick a theme?
Here I’d like to give you some advice to save your time on choosing themes, for I’ve spent a lot of time on Hugo themes, picking one, configuring it and then changing to another one.
(1) A theme that has an exampleSite folder is easier to use. Different themes have different settings, for example, on choosing which folder to store the posts. The most important file in exampleSite is the config.toml ( or config.yml, or config.json ) file, which provides an example for your configuration, so you know which parameters to tweak to get the desired result. Without exampleSite, you’ll need much more time to configure it.
(2) When previewing the theme, you need pay attention to some features that you’ll use. For example, if you write technical articles, you should check whether the theme displays Math equations and highlights code blocks well.
After I pick a theme, how to configure it?
Copy the theme folder you’ve downloaded into MySite > themes folder.
If the theme folder contains exampleSite, you can copy the files in exampleSite to MySite folder. After that, copy other folders except exampleSite ( especially archetypes, layouts, static folders ) to MySite folder.
Some themes don’t have
exampleSite. If you’re a beginner, I don’t recommend you to use it now, because you’ll spend much more time to figure out how to set the parameters. When I wrote this article, I was using Hyde as the theme of my site . I like its simple design. It doesn’t haveexampleSite. However, I have used several themes before, so I usedconfigfile of the previous themes and changed some parameters to set as the Hyde Theme.
Then Open Git Bash Prompt on MySite folder, and enter :
hugo server
When it’s done, open the URL displayed in your terminal, and you’ll see the example site locally. If you change the parameters in config.toml, the page will make corresponding changes at the same time. In this way, you can configure your site.
In the future, when you write a new post or make some revisions, you can still use hugo server to view your site locally before pushing to GitHub.
1.4 Write posts
To create a new post, open Git Bash Command on MySite folder, and enter :
hugo new new_post.md
It will create a new markdown file named “new_post” in MySite > content folder. But if you use hugo server, you may not see the new post. Why?
(1) Depending on the theme you choose, you may need to put the new_post.md into post (or posts ) folder in the content folder to generate the web page. In this case, you can also enter the following command to create a new post :
hugo new post/new_post.md
(2) Open the new post in your editor (Typora, VS Code, etc). In the header of the post , there are settings about the post (it’s also called front matter). Find draft: true , which means this post is a draft and you don’t want to publish it now. Change it to draft: false so that the post will be published on the site. Besides, the title in the header refers to the title of the post, and it is set to be the file name when created (for example, “new_post” here) . You can change it to whatever you want in your editor.
1.5 How to display images?
Although many tutorials didn’t mention how to insert and display images, I think for beginners it’s an important part in the building process, for you may add pictures to make your article easier to understand or look better.
1. For local images
In Hugo, the local images are stored in MySite > static folder in order to be displayed. Supposing you have an image named image1.jpg, after putting it into the static folder, you can insert it in your post this way :

Or you may put all images in one folder : MySite > static > imgs, then insert the image in your post by :

But the above method doesn’t display the title of the image. If you want to show the title along with the image, you can use :

Here please notice the space between the angle brackets ( < and > ) and the content.
The pipeline figure you’ve seen in “Site-Building Pipeline” Section was inserted in this way.
2. For web images
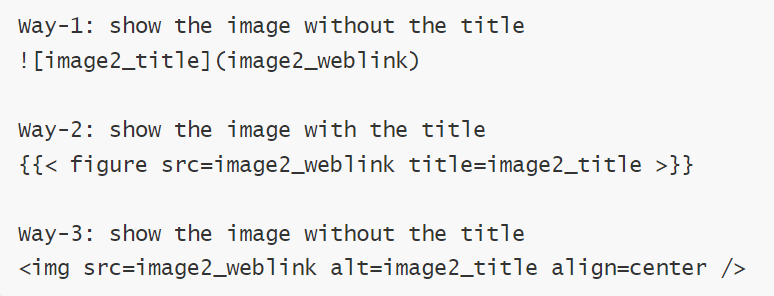
If your image is stored on the web, you can insert the image using its web link by one of the three ways below:

In way-2 and way-3, there are no double quotes around
image2_weblinkorimage2_title, i.e. writeimage2_weblink, not“image2_weblink”.
Take the Python Logo from the python.org as an example. Insert the image using the three ways:
Way-1:

Way-2:

Python-logo
Way-3:
Step 2 : Deploy the site to GitHub
2.1 Create a GitHub repository
Log in GitHub and create a public repository named YourGitHubName.github.io, this is where you’re going to store your web pages on GitHub so that others can view your site. Here please make sure YourGitHubName is the same as your GitHub username.
2.2 Build your site and push it to the repository on GitHub
I followed the steps introduced in this tutorial .
Things you need to do before deploying for the first time:
For the first time, you need to connect MySite > public folder to your GitHub repository. The public folder is the place to store your site files after they are generated by Hugo. Connect it to your GitHub repository, so that the site files will be synchronized on GitHub.
Open Git Bash Command on MySite folder, enter :
cd public
git init
git remote add upstream https://github.com/YourGitHubName/YourGitHubName.github.io.git
After that, set the parameter baseurl in config.toml to be your GitHub repository above :
baseurl = "https://YourGitHubName.github.io/"
The following are the things you do every time you push your site to GitHub:
First generate the site files:
Open Git Bash Command on MySite folder, enter :
hugo
When it’s done, Hugo will generate the site files and store it in the public folder.
Then we’ll push these files to GitHub, continue to enter:
cd public
git add .
git commit -m"your_commit_message"
git push upstream master
The above commands use
git remote add upstream...andgit push upstream master, I also used these two commands. I saw a tutorial useorigininstead ofupstream, i.e.git remote add origin...andgit push origin master, which also works. You may have a try.
Future Work
Some tutorials introduced GitHub Actions for automating the deployment, and next I’m going to learn it.
References
-
Hui Gong: How to build personal blog using GitHub Pages and Hugo
-
Hugo installation : https://www.brycewray.com/posts/2022/10/how-i-install-hugo/
-
Set the Hugo theme quickly: https://www.tomasbeuzen.com/post/making-a-website-with-hugo/ (I wish I had read the step 4 in it about the configuration of website earlier, it’s efficient.)
-
Deploy Hugo site to GitHub : https://jdhao.github.io/2018/10/10/hexo_to_hugo/